Mac Users - Unzipping
Macs can struggle to unzip large files, you might find that double clicking on the .zip file doesn't work.
The easiest way to get around this is to use the free software 'The Unarchiver' to extract the files. The Unarchiver can be found and downloaded here: https://theunarchiver.com/
What’s Included?
Adobe Photoshop Actions
- 01 - Bracken's Sticker Machine - Exporter.atn
- 02 - Bracken's Sticker Machine - Presets.atn
- 03 - Bracken's Sticker Machine - Standard.atn
- 04 - Bracken's Sticker Machine - Special Effects.atn
Adobe Photoshop Files
- StickerMachine_Small.psd
- StickerMachine_XL.psb
Installing the Actions
For most recent versions of Photoshop, you can simply double click on the .atn file and it will automatically open in Photoshop. [For some versions of Mac OS this doesn’t work properly, so skip to the step below]
01 - Open up Adobe Photoshop
02 - Open the Actions panel: Window > Actions
03 - Click on the menu at the top right and select ‘Load Actions’ from the menu.
 04 - Navigate to the included ‘01 - Actions’ folder
05 - Click on one of the .atn files and click ‘Load’. Load them in the order the files come in:
 06 - You will now see the actions appear in a folder in your ‘Actions’ panel.
Using the Mockups
In the product files there are 2 versions of the mockup file:
-
‘Sticker Machine Small’
Creates stickers that are 1024px x 1024px in size. Better for older computers as the total file size is much smaller and runs faster in Photoshop.
-
‘Sticker Machine XL’
Creates stickers that are 2048px x 2048px in size. Larger, more detailed stickers but the file size for the mockup is ~3GB so it can run slow on older systems.
The created stickers are almost identical between ‘Small’ and ‘XL’ (Apart from some subtle changes to textures to keep them crispy in both versions). The resolution of the exported stickers is the only really discernible difference between the different Sticker Machines.
01 - You must have ALL of the actions installed to make the mockup work. Once you have all of the Actions installed, open up one of the 2 Sticker Machine Mockups.
02 - You’ll be greeted by a little welcome graphic explaining with a little explainer on how to use the mockup, as well as a QR code that will send you to this page.
You can simply delete or hide this layer and you will see the sticker machine mockup, with 8 stickers on show.

03 - In the layers panel you’ll see the intro graphic, 2 smart objects, a group called ‘DO NOT TOUCH’ and a Black Background layer that is locked.
The only layers we need to worry about are the 2 smart object layers:
-
Main Sticker
This is where we put our design for the sticker.
-
Special Effect
This is where we put any design elements that we want to show up in the special effect modes: Gold, Silver, Holographic etc.
⚠ The aggressively titled folder ‘DO NOT TOUCH’ contains all of the clever layers and working bits of the mockup. If any of the contents are changed then there is a chance it will break the mockup and lead to the Actions not working correctly, so, please don’t faff with it… (You won’t need to go anywhere near it thanks to the actions!)
 04 - To add your own designs double click on the thumbnail of the layer titled ‘Main Sticker’. This will open up a new window. It has some example graphics in there as well as a Safe Zone layer at the top.
Place your graphic in the smart object, double check it’s within the Safe Zone (No content in the red zone) and then close and save the smart object (ctrl/cmd + W will close the smart object, just hit ‘save’ on the pop up window).
 06 - Woah boy, we have stickers! We have 8 versions of the same graphic with different effects and textures on them. Now the fun begins with the Actions!
Using the Actions
01 - Make sure all of the provided actions are installed in the order listed above.
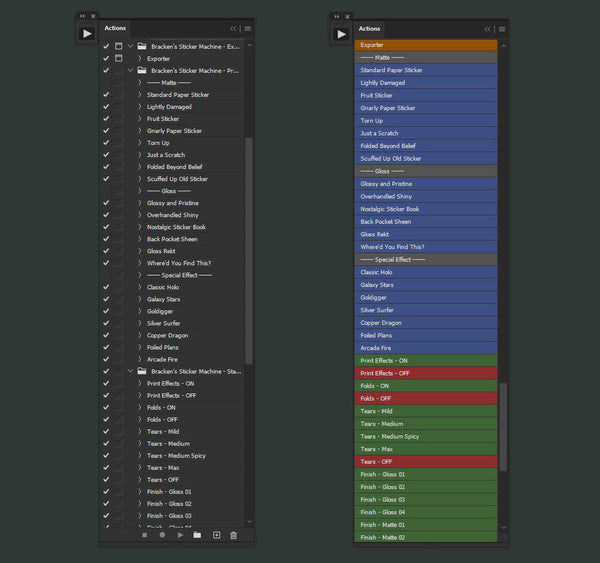 Top Tip - Because there are a lot of actions, it’s easier to view them in ‘Button Mode’ as they are colour coded and require just one click to apply.
 To activate ‘Button Mode’ simply go to the menu at the top right of the actions panel and select ‘Button Mode’. This will display all of your installed actions as buttons, some with colours and some not.
If you are seeing multiple columns of actions, just use your mouse at the edge of the panel to resize it and shrink it down so it is only one column of actions. You will then find your newly installed ‘Sticker Machine’ actions at the bottom of this list.
 02 - The actions come in different sections:
- Exporter (Orange)
- Presets (Blue)
- Standard Effects (Green for ON, Red for OFF)
- Special Effects (Purple for On, Red for OFF)
 03 - To see results right away on your sticker, click through the different Preset (Blue) actions. You will see huge changes happen to your stickers, different finishes, damage levels and even some with folded up or torn edges.
These presets are usually enough to create the look you are after but you can use the clearly labelled Standard Effect (Green and Red) actions to tailor the look to the way you like it.
Using Special Effects
⚠ If you select a Special Effect preset without changing the smart object, you may see something strange happen.
The special effect presets and effects make use of the 2nd smart object titled ‘Special Effect [Change Me]’.
 01 - Go into the smart object and place any design elements you want to show up as Foil or Holographic above the white background layer.
 02 - Make sure any of these design elements are 100% black, and that the white background of the smart object is not deleted.

When you save and close this, you will either see it appear right away, unless you have selected a preset without special effects. If this is the case, select a special effect preset and see the magic happen!
Exporting your Stickers
01 - When you are happy with the way your sticker looks, play the ‘Exporter’ action.
02 - This will open a new window using the ‘Save for Web’ feature of Photoshop.

03 - Hit ‘Save’ and select where you want to save the stickers. (Ignore any of the detail at the top right this action saves as PNGs so don’t worry if it says anything else at the top right)
The 8 unique PNGs will go into their new destination in a folder named ‘Sticker Machine Outputs’ and their filenames are structured as follows: ‘filename-Sticker_01.png’, ‘filename-Sticker_02.png’ etc.
⚠ Do not change any settings in either the ‘Save for Web’ window, or in the ‘Save As’ window.
 04 - The window will close and you will be back in the mockup. You can find your PNG stickers in the folder you selected when saving.
And that's it, this is wicked fun to play about with and I know you'll have a hoot knocking out some sick stickers in no time at all!
Cheers geez,
Tim